Configuring private V2Ray server for bypassing internet censorship (TLS configuration)
Today many countries are trying to block access to internet resourses that are not convenient for them – oppositional websites, social resourses and so on. In this article you will find solution that will works at most of such circumstances
Little preface
When I lived in Russia I very often met a lot of censorship in internet – you could not access opositional websites, news sites, could not use some social media platforms (yes, instagram, facebook and linkedIn is blocked there). Later when I move to other countries, I understand that not only my country cleans up internet, others do the same (of course they do it differ, but anyway). So I started searching for some solution that would work at most of the time. And I find it – it is V2Ray.
As it is writen on the official website V2Ray is part of the Project V toolkit, that allows you to create your own private network that will work over internet. It is hard to be discovered and to be blocked even with DPI systems, that goverments use today for censorship. V2Ray is popular even in China, where the scale of censor beats all limits.
One of the great posibilies of V2ray is ability to masqarade your traffic as usual HTTPs. In such case your ISP provider will think that you just access this site. I use such configuration and will disclose installation process for you here. Also there are different ways to configure V2ray, you can read about them here.
Explanation
How does it works?
Here is little schema that disclose some common parts of the configuration that we will implement.
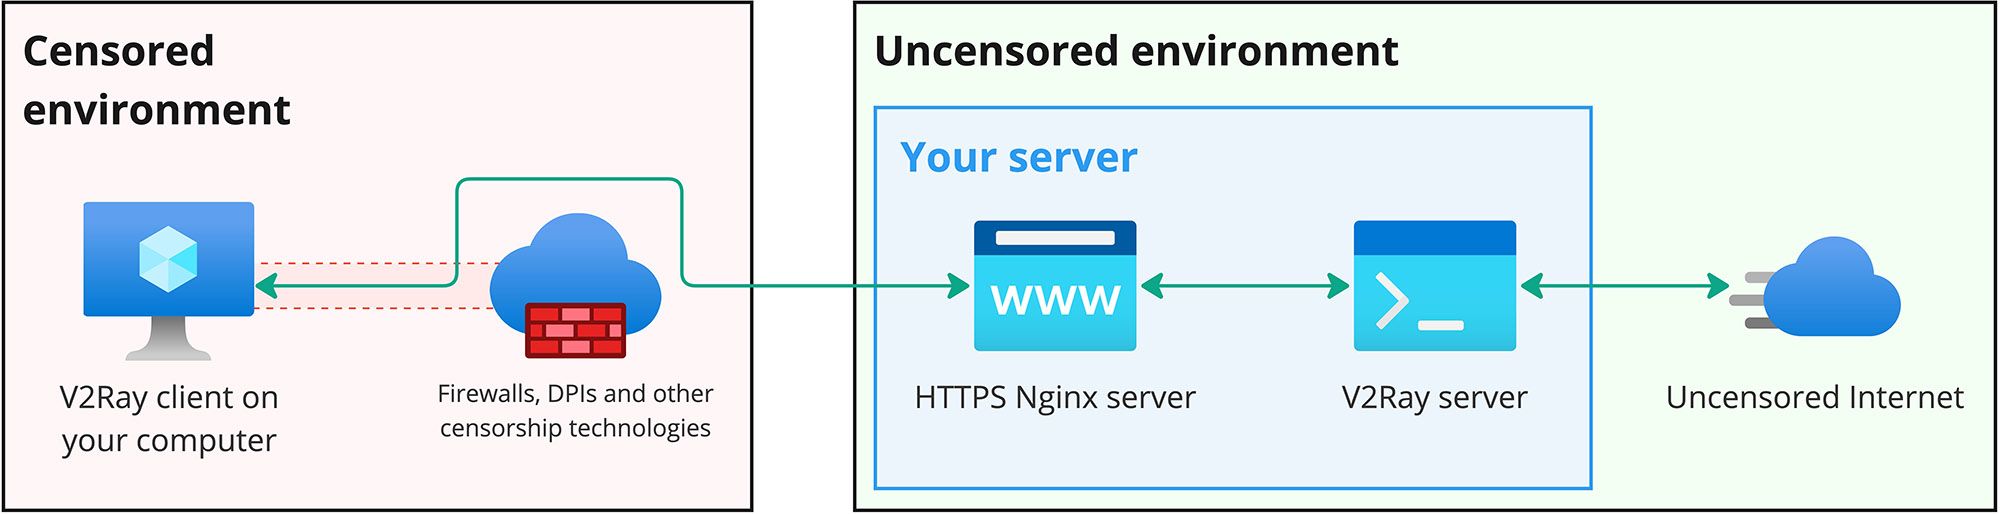
- V2Ray client on your personal computer wraps all your internet traffic into HTTPs and sends it to your server. ISP (and all censorship middleware) does not see anything strange in your traffic as it looks like normal HTTPs traffic;
- All encrypted trafic arrives to Nginx server on your VPS server. Nginx decrypt it and send it forward to V2Ray server;
- V2Ray server checks authentification of traffic using internal mechanisms and sends it to global internet if everything is good.
Why not to use classic VPN protocols?
Of course you can use classic VPN protocols if they work in your situation. But because of there popularity goverments with there friendly technical companies invest a lot of money to find solutions to block them. For example:
- WireGuard, OpenVPN can be blocked with DPI (and is blocked in Iran, Egypt, Uzbekistan and in many other countries). Of course there a lot of different bypassing methods to make it work – for example use additional obfuscation methods and so on. But it can be difficult to make it work sometimes or have some techinal limitations;
- A lot of good solutions, such as Outline VPN are using UDP protocol, that can be blocked by some companies (it's strange to hear, but I've experienced it). And you need to find some other solution.
When you understand that, you will find out that having one more solution is nice opportunity.
What will you need?
To make V2Ray work as it is explained in this article, you will need:
- Dedicated or virtual private server in some region where there is no censorship or it is weak (Germany, Netherlands, Latvia and so on). Personally I use Digitalocean, I like there price politics (it starts from 4$ per month and it is enough for V2Ray to work) and excellent level of service, but you can choose other service provider
- Valid internet domain, that you can control and for which you can obtain SSL serficate
- Some skills in administation of linux servers
- Time to deploy and configure everything
In case if you have not got account in DigitalOcean, here are my referal link. If you will sign up with it you will get up to 200$ bonus for your first server and will support me as author. Thanks!
Installation guide
Step 1. Initial setups
First of all create VPS server and obtain SSH access to it. For better security I recommend to secure your service creating non-root user and enabling ufw firewall. You can view how to do it in this instruction. Just do not forget to open 443 port for our configuration of v2ray.
Step 2. Installing v2ray
- After all initial setup, we need to load and install v2ray on our server
$ bash <(curl -L https://raw.githubusercontent.com/v2fly/fhs-install-v2ray/master/install-release.sh)
- Now we can enable
v2rayand check does it works or not (status of server must beactive)
$ sudo systemctl enable v2ray
$ sudo systemctl start v2ray
$ sudo systemctl status v2ray
● v2ray.service - V2Ray Service
     Loaded: loaded (/etc/systemd/system/v2ray.service; enabled; preset: enabled)
    Drop-In: /etc/systemd/system/v2ray.service.d
             └─10-donot_touch_single_conf.conf
     Active: active (running) since Tue 2022-11-29 09:32:50 UTC; 4s ago
       Docs: https://www.v2fly.org/
   Main PID: 2244 (v2ray)
      Tasks: 6 (limit: 512)
     Memory: 8.2M
        CPU: 29ms
     CGroup: /system.slice/v2ray.service
             └─2244 /usr/local/bin/v2ray run -config /usr/local/etc/v2ray/config.json
As you can see service was successfully started and is using configuration file that is located at /usr/local/etc/v2ray/config.json. We will return to this later.
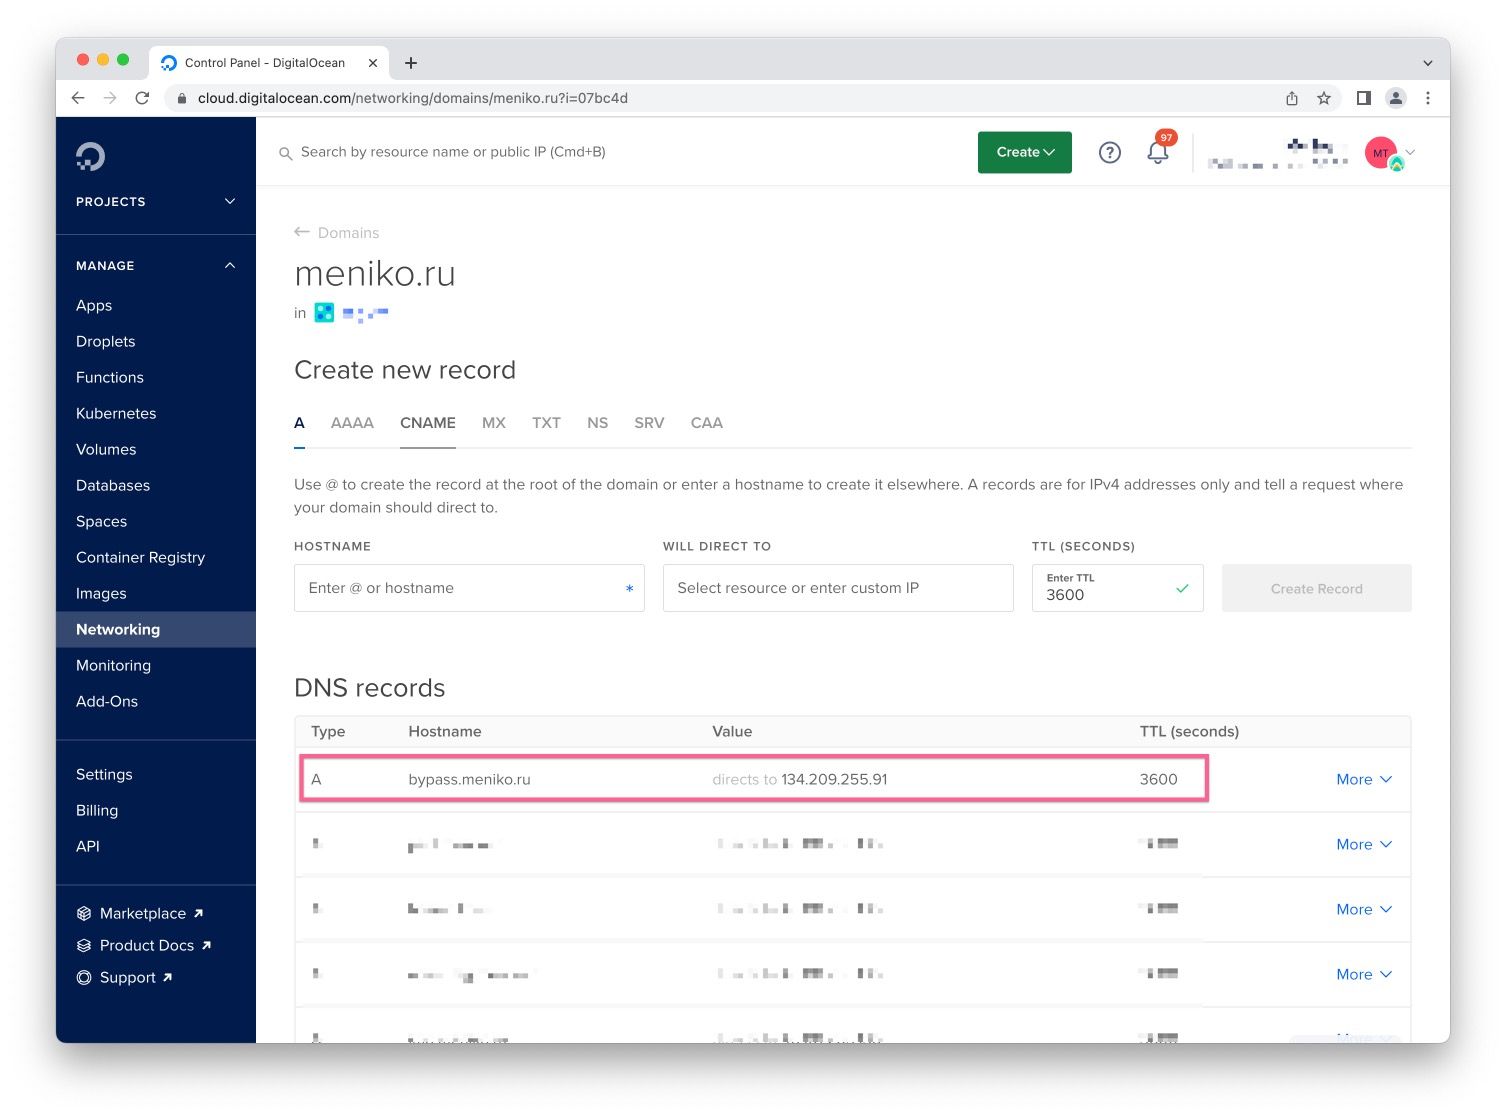
Step 3. Setting up domain DNS records
- Next step is to create
A-type DNS record for your domain, so that our server can receive trafic that is going to it. I use third level domain for thisbypass.meniko.ru(but it can be anything you like). After you do this, you need to wait until new DNS record would be global wide available, it can take from 30 minutes to hours, need to wait a bit.
Step 4. Creating SSL sertificate
- When DNS records was successfully updated and we can ping our new domain, we can go further and setup HTTPs sertificate with LetsEncrypt and CertBot and setup our Nginx server on our VPS server. First install everything with this:
$ sudo apt-get install nginx -y
$ sudo apt-get install certbot python3-certbot-nginx
- Now is the time to get SSL sertificate using CertBot, it will ask for your email address, agree with terms and tell it domain address that we created before
$ sudo certbot --nginx
Saving debug log to /var/log/letsencrypt/letsencrypt.log
Enter email address (used for urgent renewal and security notices)
 (Enter 'c' to cancel): ***@meniko.ru

- - - - - - - - - - - - - - - - - - - - - - - - - - - - - - - - - - - - - - - -
Please read the Terms of Service at
https://letsencrypt.org/documents/LE-SA-v1.3-September-21-2022.pdf. You must
agree in order to register with the ACME server. Do you agree?
- - - - - - - - - - - - - - - - - - - - - - - - - - - - - - - - - - - - - - - -
(Y)es/(N)o: y

- - - - - - - - - - - - - - - - - - - - - - - - - - - - - - - - - - - - - - - -
Would you be willing, once your first certificate is successfully issued, to
share your email address with the Electronic Frontier Foundation, a founding
partner of the Let's Encrypt project and the non-profit organization that
develops Certbot? We'd like to send you email about our work encrypting the web,
EFF news, campaigns, and ways to support digital freedom.
- - - - - - - - - - - - - - - - - - - - - - - - - - - - - - - - - - - - - - - -
(Y)es/(N)o: n
Account registered.
Please enter the domain name(s) you would like on your certificate (comma and/or
space separated) (Enter 'c' to cancel): bypass.meniko.ru
Requesting a certificate for bypass.meniko.ru

Successfully received certificate.
Certificate is saved at: /etc/letsencrypt/live/bypass.meniko.ru/fullchain.pem
Key is saved at:         /etc/letsencrypt/live/bypass.meniko.ru/privkey.pem
This certificate expires on 2023-02-27.
These files will be updated when the certificate renews.
Certbot has set up a scheduled task to automatically renew this certificate in the background.

Deploying certificate
Successfully deployed certificate for bypass.meniko.ru to /etc/nginx/sites-enabled/default
Congratulations! You have successfully enabled HTTPS on https://bypass.meniko.ru

- - - - - - - - - - - - - - - - - - - - - - - - - - - - - - - - - - - - - - - -
If you like Certbot, please consider supporting our work by:
 * Donating to ISRG / Let's Encrypt:   https://letsencrypt.org/donate
 * Donating to EFF:                    https://eff.org/donate-le
- - - - - - - - - - - - - - - - - - - - - - - - - - - - - - - - - - - - - - - -
- We can go to our domain and check that connection is now secure (CertBot automatically updates Nginx config for our domain)

Step 5. Configure Nginx
- Great lets configure our Nginx. All its configs are located in the folder
/etc/nginx/sites-available. If you are making changes on new server, default config file for your new domain will be calleddefault. In this case open this config file and replace it content with this lines. Do not forget to change my domainbypass.meniko.ruto yours.
server {
  listen 80;
  server_name bypass.meniko.ru;
  return 301 https://bypass.meniko.ru$request_uri;
}

server {
  listen 443 ssl;
  server_name bypass.meniko.ru;

  ssl_certificate /etc/letsencrypt/live/bypass.meniko.ru/fullchain.pem;
  ssl_certificate_key /etc/letsencrypt/live/bypass.meniko.ru/privkey.pem;

  include /etc/letsencrypt/options-ssl-nginx.conf;
  ssl_dhparam /etc/letsencrypt/ssl-dhparams.pem;

  location / {
    root /var/www/html;
    index index.html index.htm index.nginx-debian.html;
  }

  location /v2ray {
    if ($http_upgrade != "websocket") {
        return 404;
    }
    proxy_redirect off;
    proxy_pass http://127.0.0.1:10000;
    proxy_set_header Upgrade $http_upgrade;
    proxy_set_header Connection "upgrade";
    proxy_set_header Host $host;

    # Show real IP in v2ray access.log
    proxy_set_header X-Real-IP $remote_addr;
    proxy_set_header X-Forwarded-For $proxy_add_x_forwarded_for;
  }
}
- Time to check is everything ok with our config and restart the server. Also check that status of nginx is
active.
$ sudo nginx -t
nginx: the configuration file /etc/nginx/nginx.conf syntax is ok
nginx: configuration file /etc/nginx/nginx.conf test is successful
$ sudo systemctl restart nginx
$ sudo systemctl status nginx
● nginx.service - A high performance web server and a reverse proxy server
     Loaded: loaded (/lib/systemd/system/nginx.service; enabled; preset: enabled)
     Active: active (running) since Tue 2022-11-29 11:40:44 UTC; 4min 25s ago
       Docs: man:nginx(8)
    Process: 4190 ExecStartPre=/usr/sbin/nginx -t -q -g daemon on; master_process on; (code=exited, status=0/SUCCESS)
    Process: 4191 ExecStart=/usr/sbin/nginx -g daemon on; master_process on; (code=exited, status=0/SUCCESS)
   Main PID: 4192 (nginx)
      Tasks: 2 (limit: 512)
     Memory: 3.3M
        CPU: 49ms
     CGroup: /system.slice/nginx.service
             ├─4192 "nginx: master process /usr/sbin/nginx -g daemon on; master_process on;"
             └─4193 "nginx: worker process"
Configure V2Ray server
-
Now we need to update config file for our V2ray server that we installed previously. Default V2ray config is located at
/usr/local/etc/v2ray/config.json, open it and insert this lines.You need change
idof client (you can use this service to generating new one). Also note path/v2ray, you can change it, but do not forget to changenginxand clients config respectively. For educational purposes I recommend to leave it as is.As you can see here we generate 1 inbound and 1 outbound routing. In these example we use
vmessprotocol for extra encryption of data. For comunication beetween client and server we will use websockets. As I said previously there are other options, you can read about them on official site
{
  "inbounds": [
    {
      "port": 10000,
      "listen":"127.0.0.1",
      "protocol": "vmess",
      "settings": {
        "clients": [
          {
            "id": "95880cb0-0b23-4e87-9042-c8a1bc4e5c0f",
            "alterId": 0
          }
        ]
      },
      "streamSettings": {
        "network": "ws",
        "wsSettings": {
        "path": "/v2ray"
        }
      }
    }
  ],
  "outbounds": [
    {
      "protocol": "freedom",
      "settings": {}
    }
  ]
}
- Now we can restart V2ray service and check is it works (as usual status must be
active):
$ sudo systemctl restart v2ray
$ sudo systemctl status v2ray
● v2ray.service - V2Ray Service
     Loaded: loaded (/etc/systemd/system/v2ray.service; enabled; preset: enabled)
    Drop-In: /etc/systemd/system/v2ray.service.d
             └─10-donot_touch_single_conf.conf
     Active: active (running) since Tue 2022-11-29 11:57:13 UTC; 4s ago
       Docs: https://www.v2fly.org/
   Main PID: 4346 (v2ray)
      Tasks: 5 (limit: 512)
     Memory: 14.1M
        CPU: 29ms
     CGroup: /system.slice/v2ray.service
             └─4346 /usr/local/bin/v2ray run -config /usr/local/etc/v2ray/config.json
We successfully configured our server side, now time to setup our client.
Configure our V2Ray client
In this part of article I will show you how to configure clients on Windows (GUI client) and Mac OS (CLI client) machines respectively. Also I would like to note that there are a lot of different clients, you can choose from. You can find full list here at official site.
Before we begin, here is client configuration file that would be used in both configurations for Windows and Mac OS. You will need to save it with extension .json.
{
  "inbounds": [
    {
      "port": 1080,
      "listen": "127.0.0.1",
      "protocol": "socks",
      "sniffing": {
        "enabled": true,
        "destOverride": ["http", "tls"]
      },
      "settings": {
        "auth": "noauth",
        "udp": false
      }
    }
  ],
  "outbounds": [
    {
      "protocol": "vmess",
      "settings": {
        "vnext": [
          {
            "address": "bypass.meniko.ru",
            "port": 443,
            "users": [
              {
                "id": "95880cb0-0b23-4e87-9042-c8a1bc4e5c0f",
                "alterId": 0
              }
            ]
          }
        ]
      },
      "streamSettings": {
        "network": "ws",
        "security": "tls",
        "wsSettings": {
          "path": "/v2ray"
        }
      }
    }
  ]
}
Configuration of Qv2ray GUI client for Windows
As I said previously there are a lot of different options to choose as v2ray client for Windows. I found that Qv2ray is one of the most intresting solutions for this, as it is popular and have good localization. Here I will show you how to configure it, but you can choose any other that you like the most.
-
First of all you will need to download
v2ray corefrom official Github account. https://github.com/v2ray/v2ray-core/releases -
Unpack it and place whenever you want on your Windows computer;
-
Next download
Qv2rayfrom this page. At the moment of writing this article there was 2.7.0 version and I downloadQv2ray-v2.7.0-Windows-Installer.exe -
Install
Qv2Raythat was downloaded on previous step -
Open installed
Qv2Rayclient -
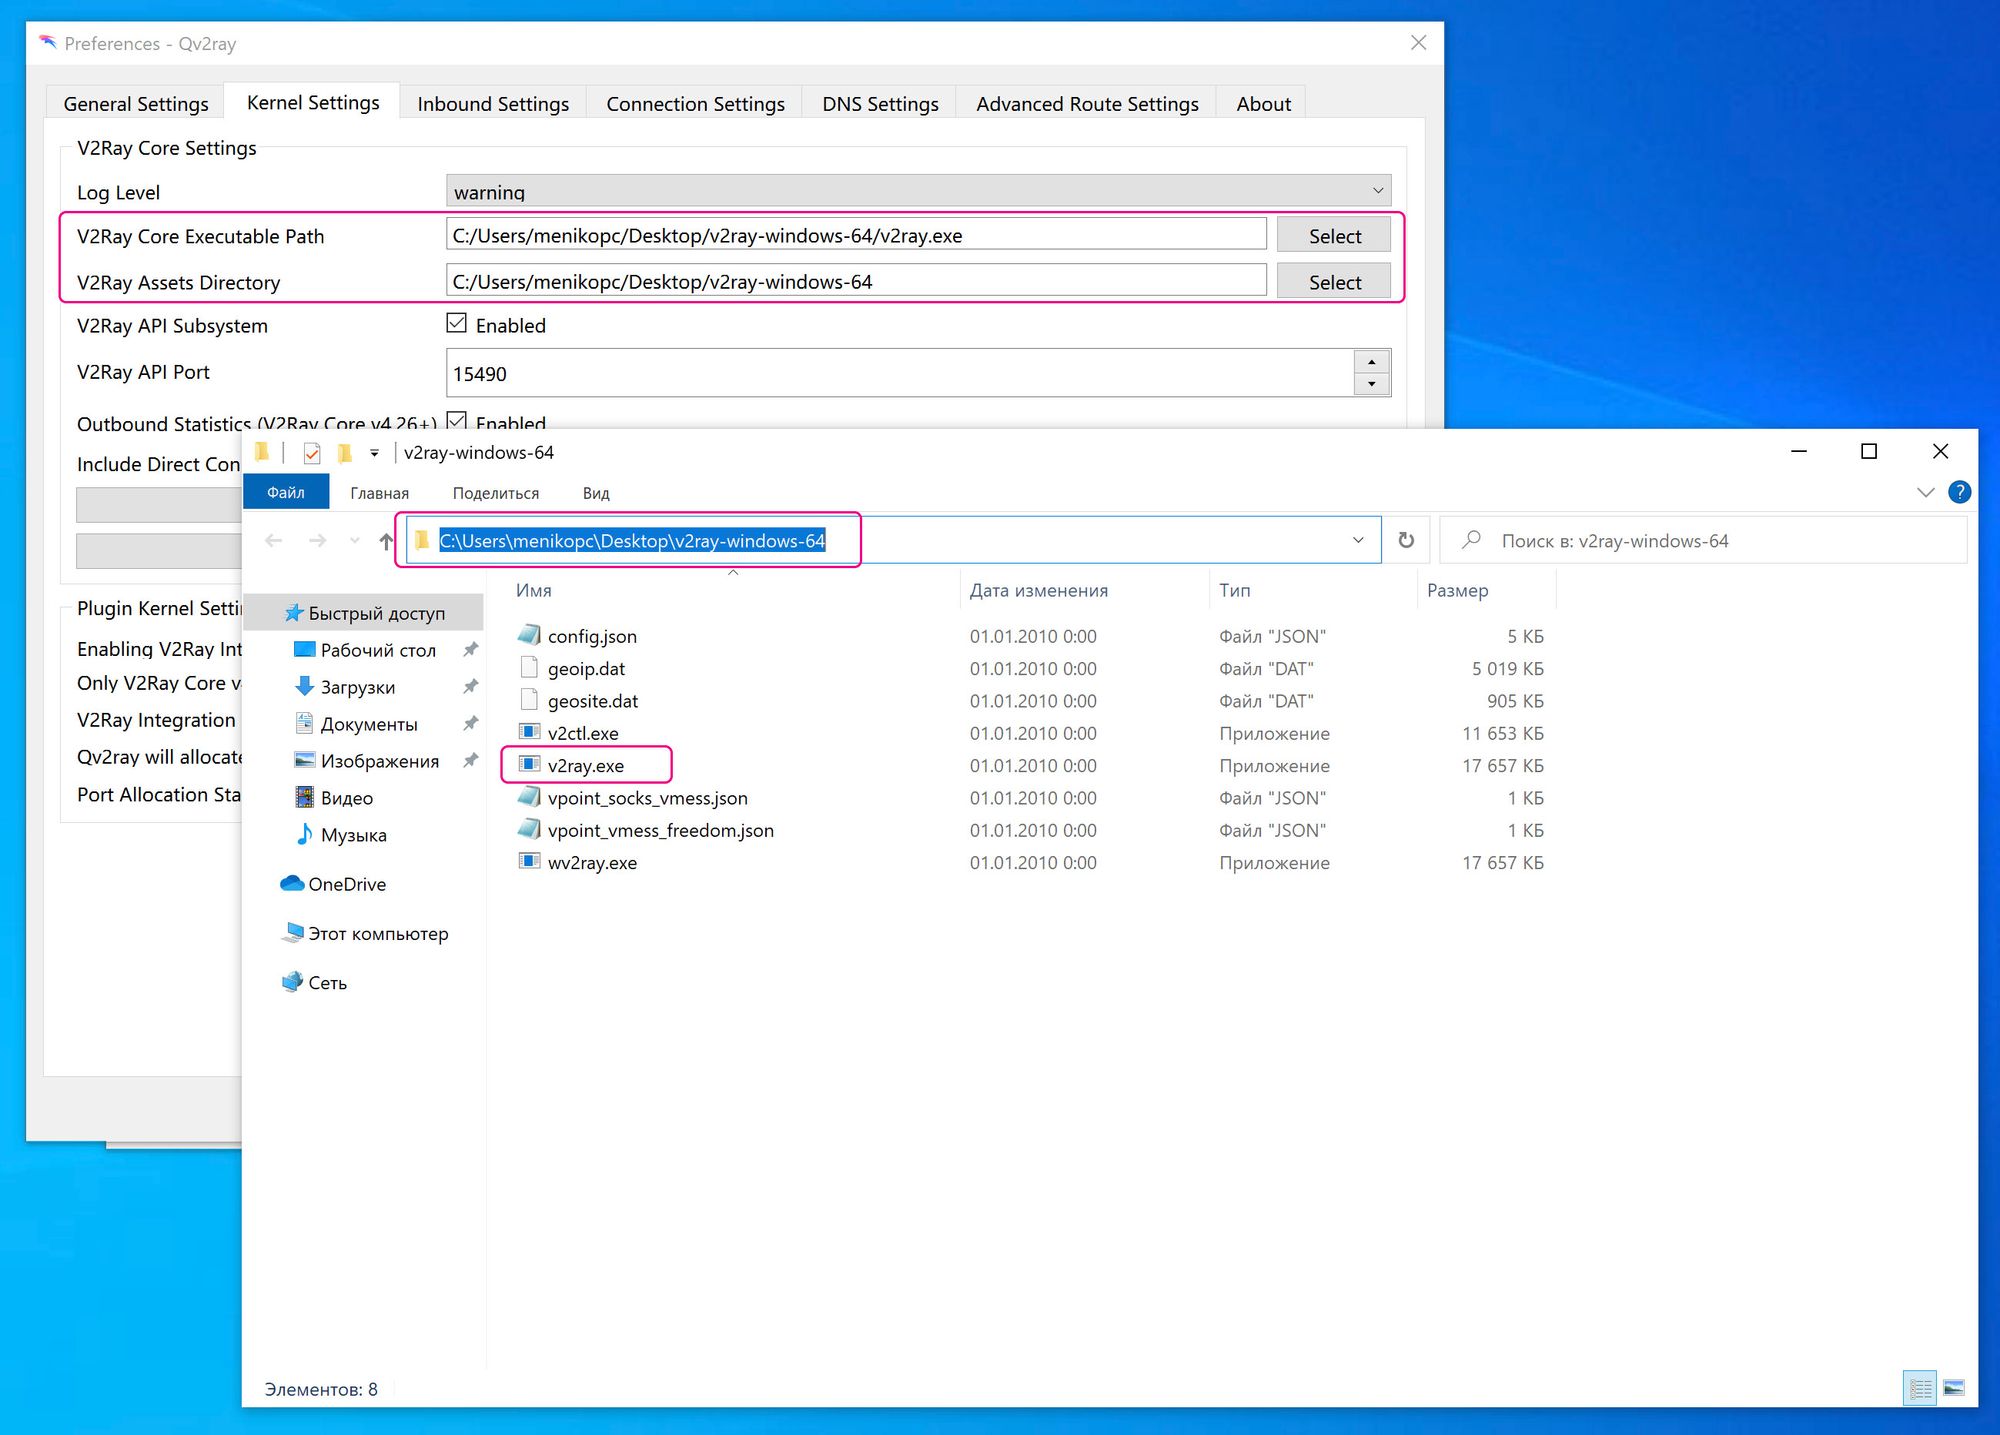
Now you need to define where your
v2coreis located (that we downloaded on first two steps). InQv2RayopenPreferencesmenu and go toKernel settingsand define paths as shown on image
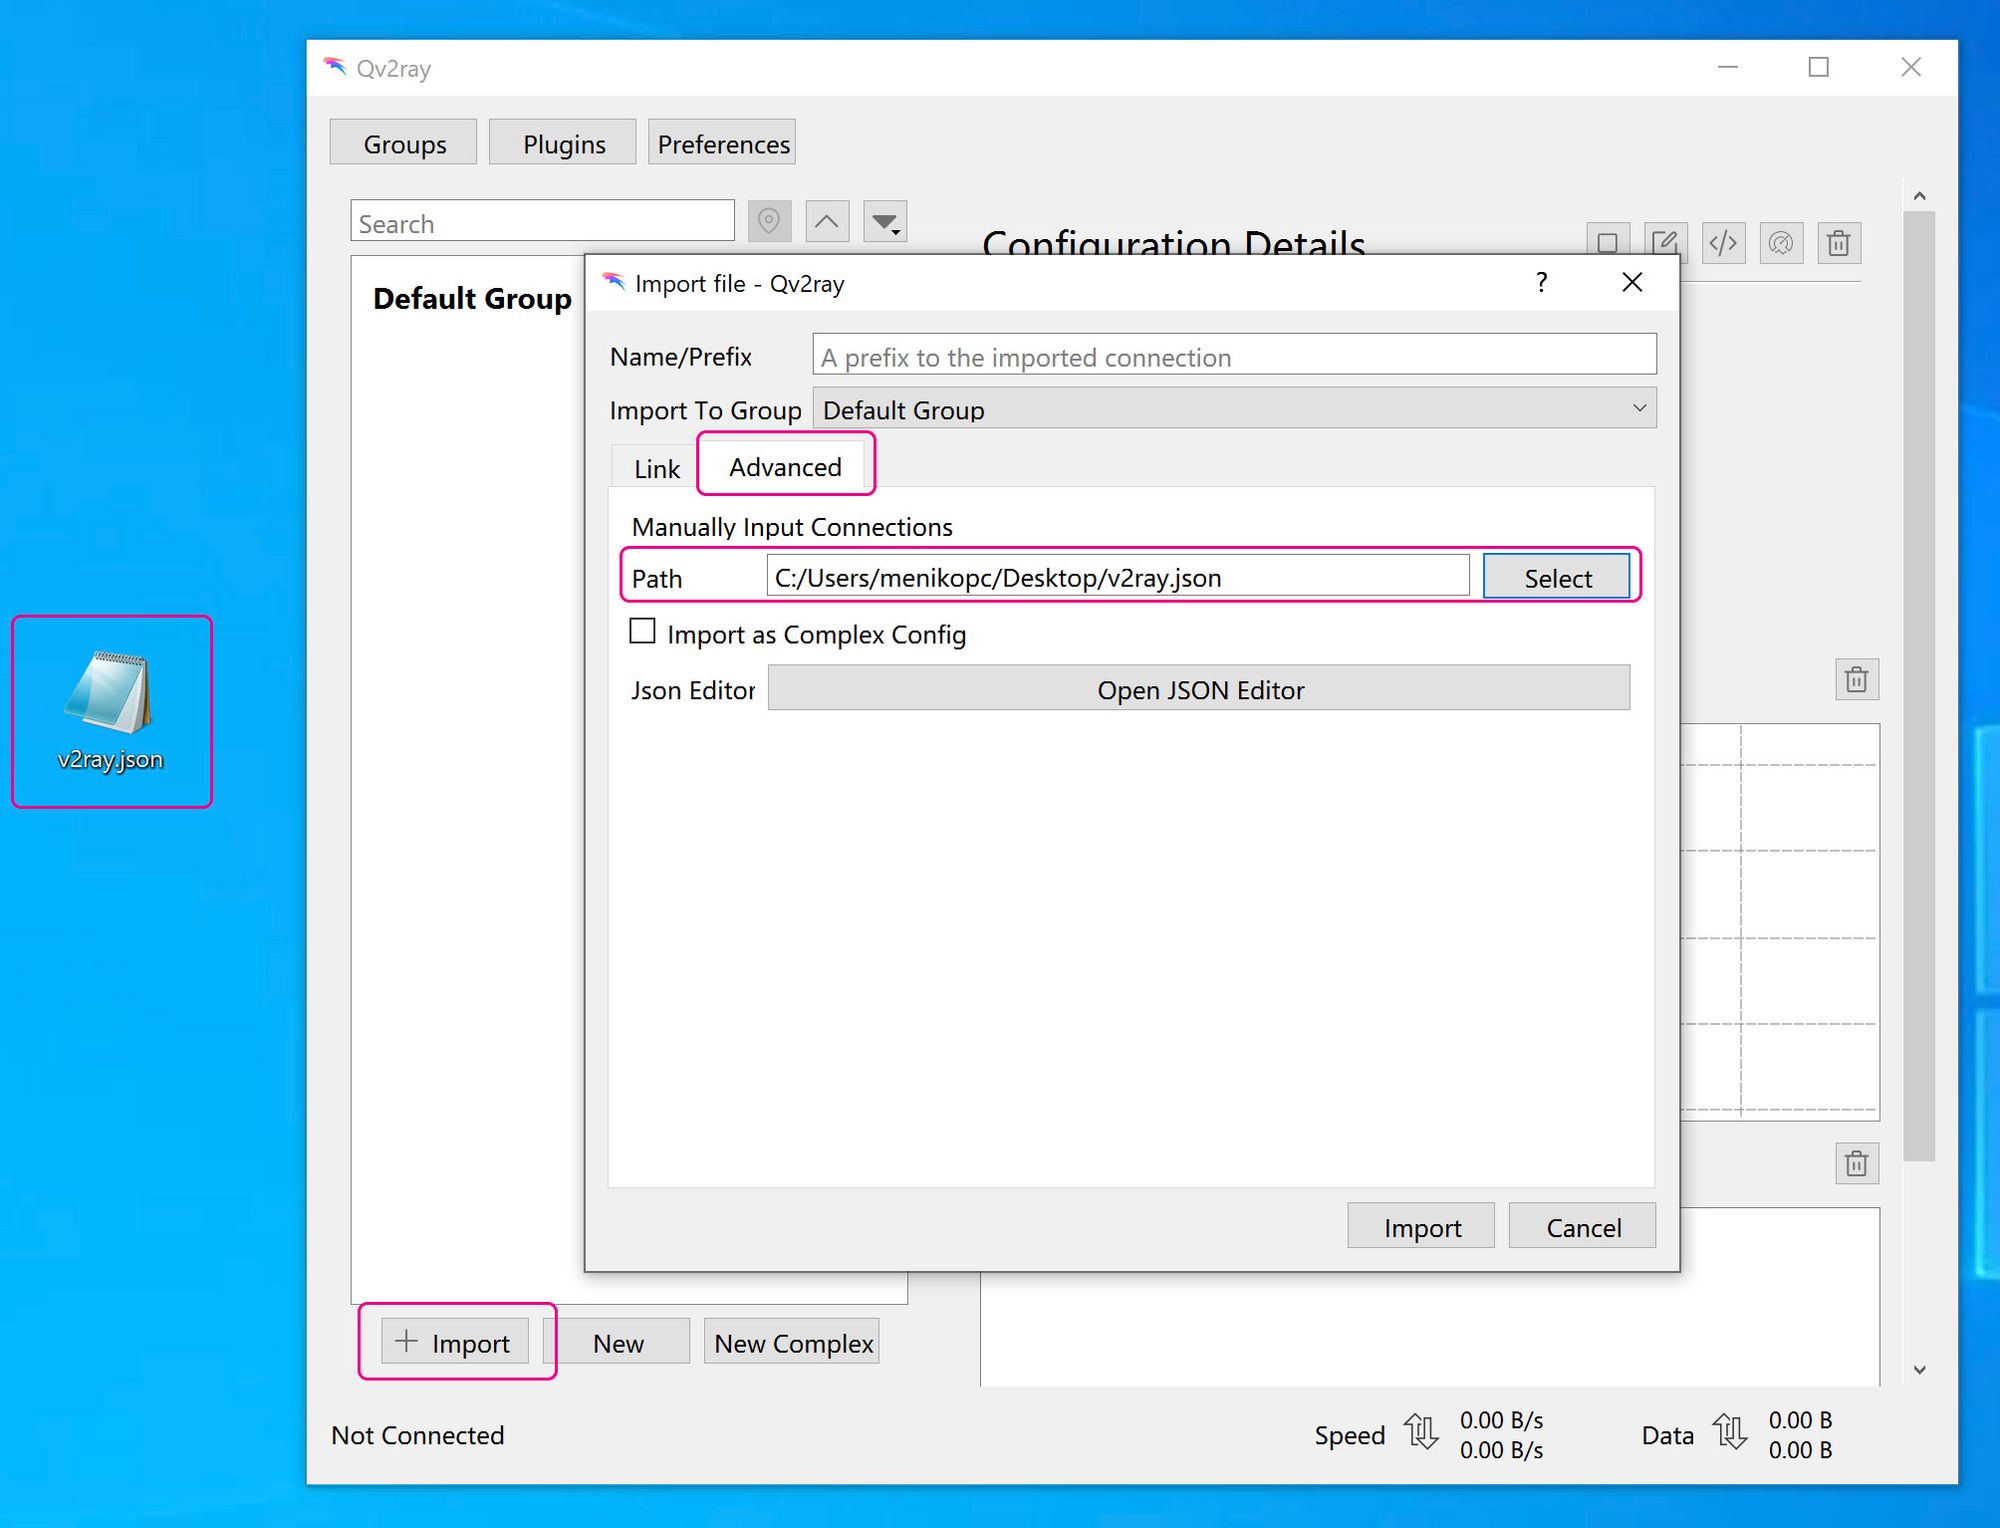
- Now it’s time to add our client
v2ray configtoQv2ray. Createv2ray.jsonfile whenever you want and copyclient configto it (you can find it little a bit above). Do not forget to changeaddressandidto match your configurations). Lastly add it toQv2rayvia+ Import→Advancedmenu as shown on image
- If you do everything correctly you can connect to your server and check does your IP address was changed to new one
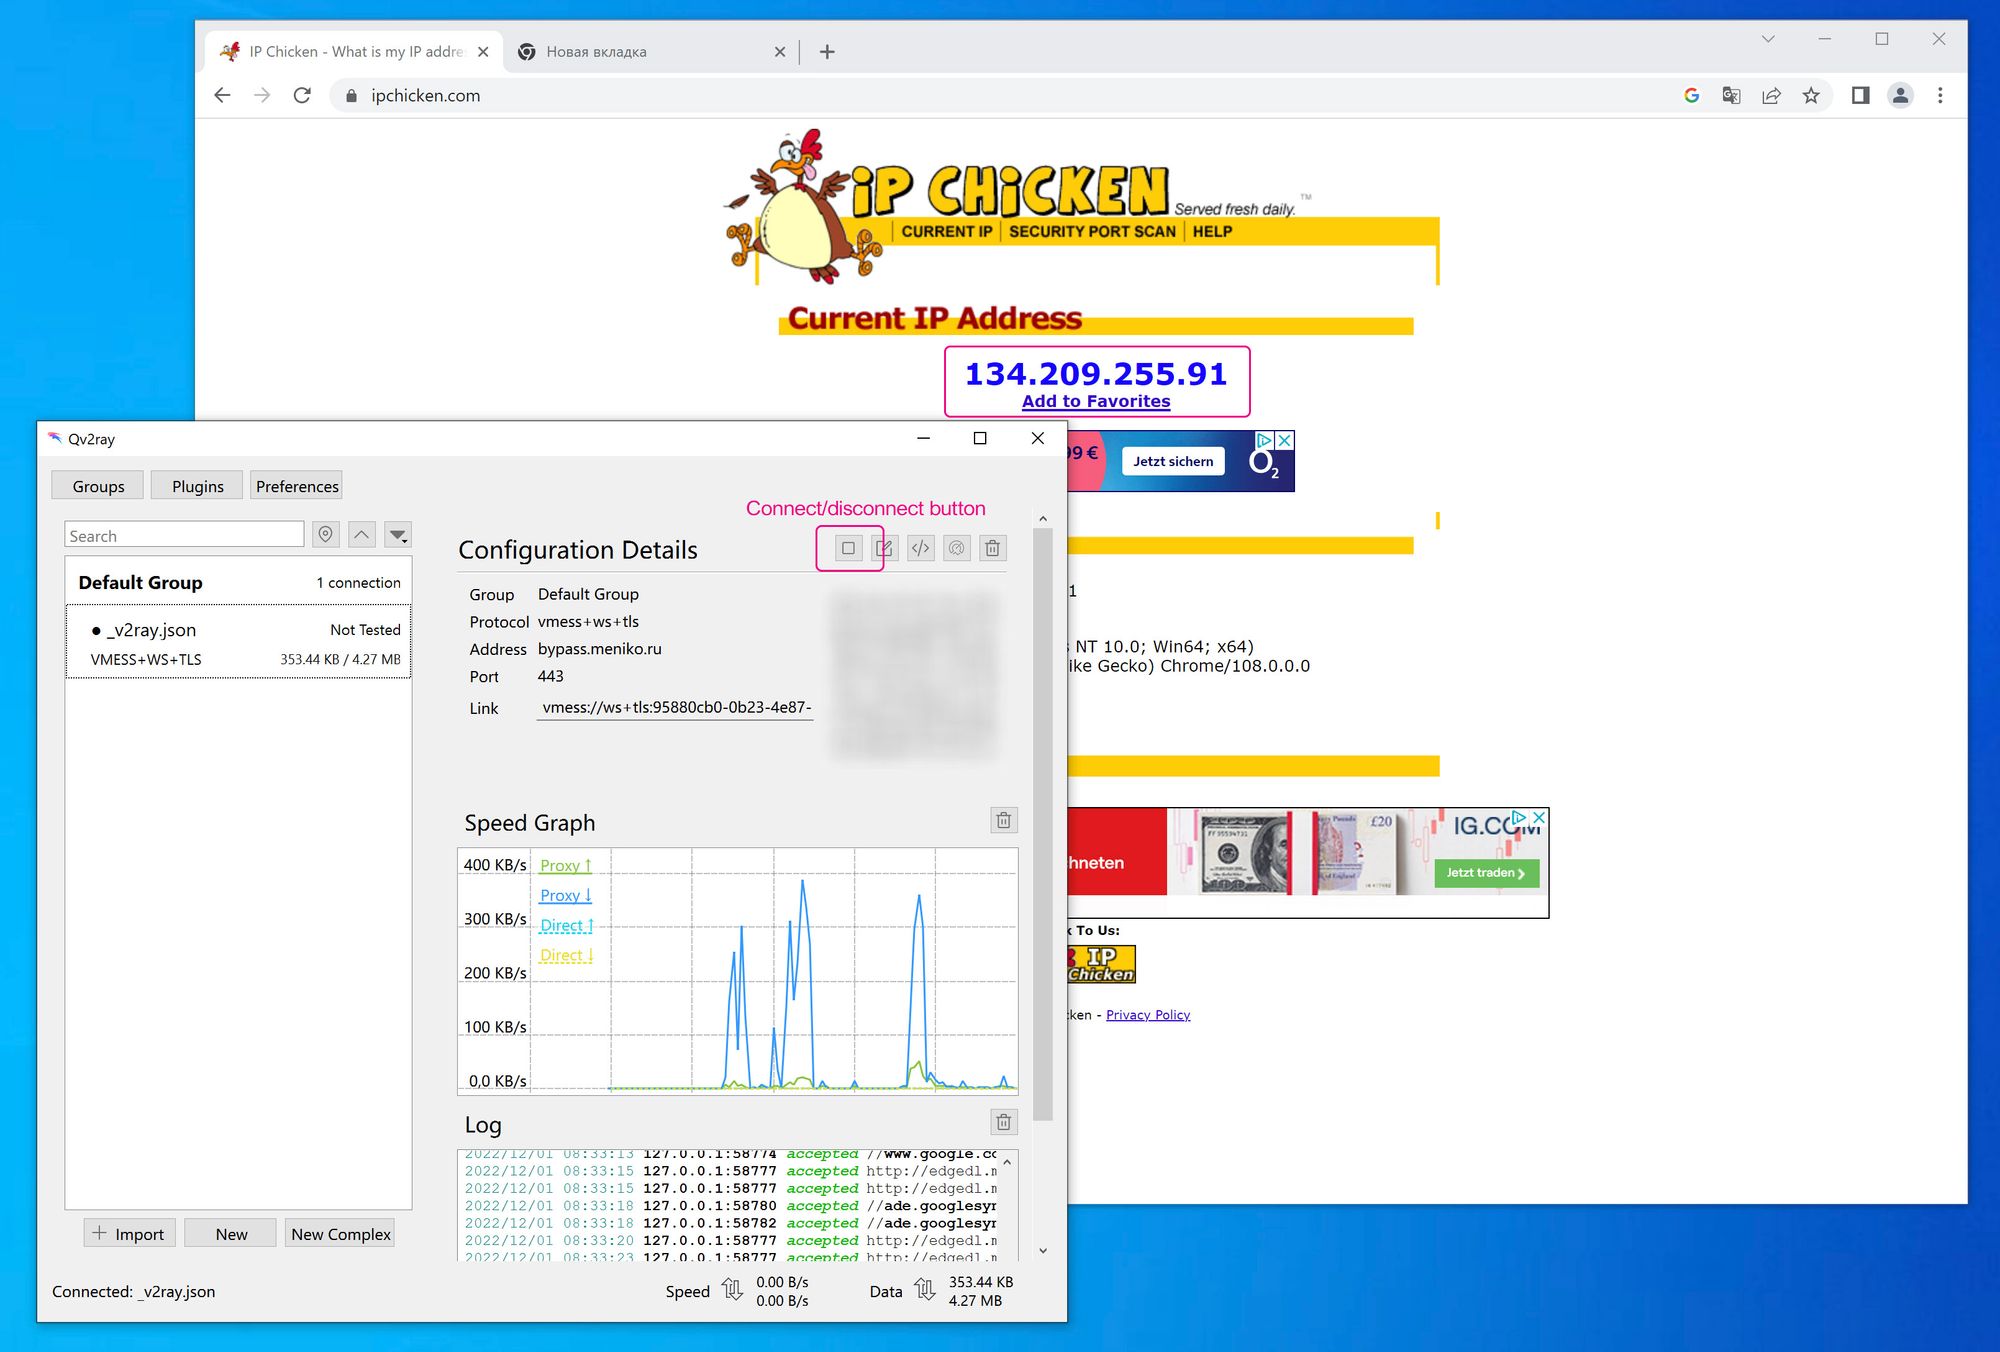
Now you can use your v2ray and access any site that is available from network where your server is located. Congratulations!
Configuration for Mac OS with CLI
There are a lot of good GUI software for Mac OS as well. But here I would not go this way, we will use v2ray in CLI mode and configure everything manually.
- To install V2Ray you can use brew package manager (if you have not use it before, it’s time for it; you can find instructions on official site)
$ brew install v2ray
- If installation was successfull, this command should return version of V2ray:
$ v2ray -version
V2Ray 4.45.2 (V2Fly, a community-driven edition of V2Ray.) Custom (go1.17.11 darwin/amd64)
A unified platform for anti-censorship.
-
Now we need to create configuration file for our client, create file
config.jsonin any directory and insert lines of client configuration that was shown before (changeaddressandidto match your configurations) -
Now it’s time to start your
v2ray client. Just callv2rayservice and define path to config file with in-configparameter
$ v2ray -config config.json
V2Ray 4.45.2 (V2Fly, a community-driven edition of V2Ray.) Custom (go1.17.11 darwin/amd64)
A unified platform for anti-censorship.
2022/12/01 11:28:24 [Info] main/jsonem: Reading config: config.json
2022/12/01 11:28:24 [Warning] V2Ray 4.45.2 started
-
V2rayis now working and has started Proxy5 server on 127.0.0.1:1080 to which you need send traffic of your computer -
Define this proxy server in Mac OS settings. Go to
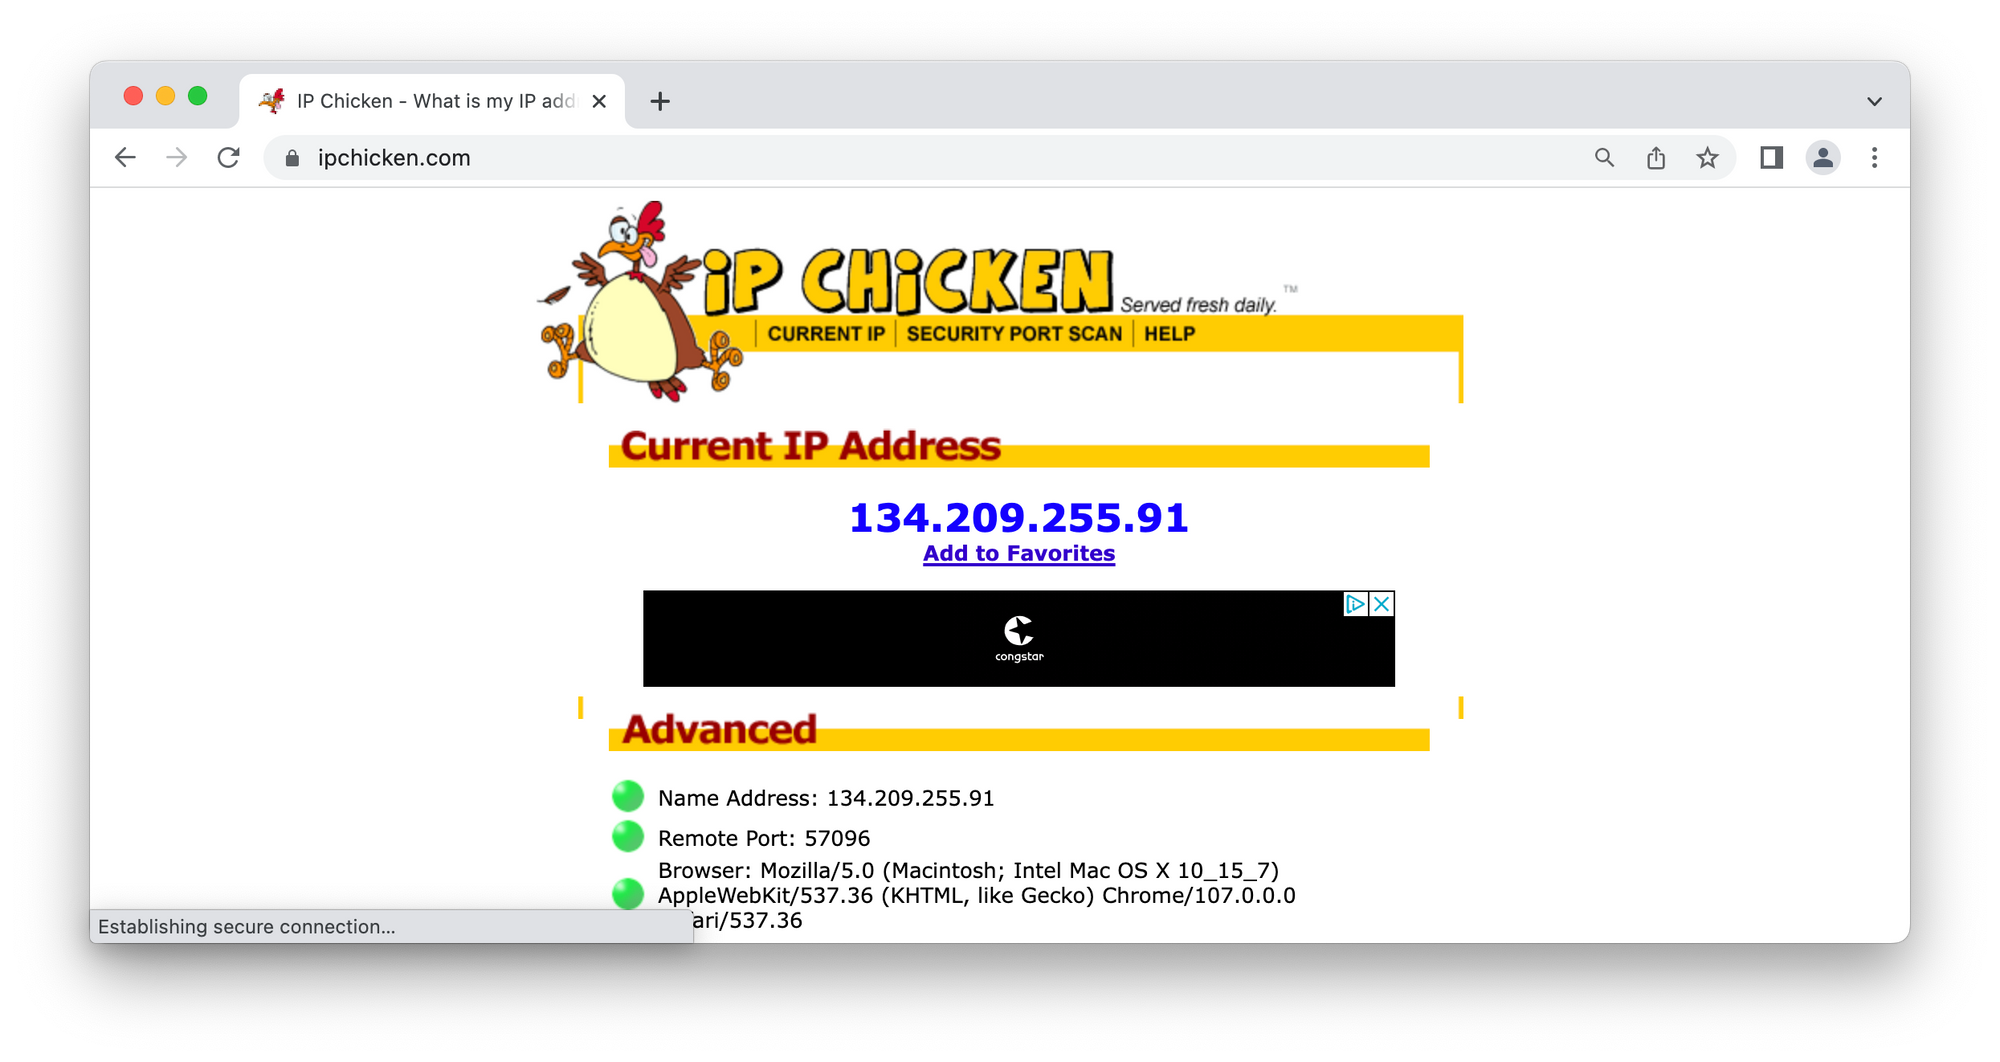
Preferences→Network→ Choose your active interface and go toadvancedoptions → OpenProxiestab →SOCKS Proxyand add Socks Proxy server address and port as show on image

- Now everything should work and you can go and check whenever your address was changed. We’re done!
I hope that this article was helpful for you and you succesfully configure your own v2ray server. This configuration must allow you to unlock internet even in most difficult and restricted situations – such as blocked ports on your local network, resticted UDP packages and many other.
For better security you also need to think about hiding your DNS requests using DNS over HTTPs or some other technics. But this is not topic of this acticle.
If you have any questions or comments leave them below.